All month I've been waffling over joining Me-Made-May this year. On the one hand it's a fun way to meet more sewers and see different patterns made up. On the other hand frankly I'm tired. April has been full of health issues for my family, from garden variety colds (everyone), to teeth issues (me), to sitting up all night in the emergency room because of kidney stones (my husband). Can I order 2 weeks in a dark cave all by myself? A mini hibernation vacation might just do the trick.
Now that it's deadline time I decided to switch to caffeinated tea and join the crowd. I'm committing to 3/4 outfits a week that include some sort of me-made item. The outfits will go up "in real time" on my instagram feed but I'll only be doing a weekly round up here. Easy peasy, lemon squeezy.
Speaking of Stash Layers
4.29.2015
Last week's blog post was really supposed to be this one, but Professor Froggie's helpful teaching aid spun me off on a "scientific" tangent. I think that was for the best.
Lately I've been pondering over my inability to sew the "orange layers" of fabric in my stash and what to do about it. My sewing records clearly show that with the exception of Butterick 5824, I've been sewing exclusively from layers 1 and 2 this year. I'm not surprised by this since I'm a "non-planner/SQUIRREL!" type of sewer. The new shiny thing is usually going to draw my focus and become the next project.
This is all well and good except there are some older pieces of fabric that I'd actually like to wear. How do I trick myself into sewing those things up with it becoming a chore? Here are the possibilities I'm currently mulling.
1. Have an older stash only month of sewing.
Pros - a clear time frame might help me focus on using this fabric.
Cons - Potentially sew-jo killing if I decide that sewing old fabric sucks.
2. Make a rule that after sewing 2 projects from new fabric, I must sew 1 from old fabric.
Pros - Mixing in some newer fabrics may keep the sew-jo flowing.
Cons - Keeping track of numbers of projects is quickly going to get on my nerves. I can see myself just abandoning the system after a bit.
3. Plan a wardrobe capsule that incorporates old and new fabric.
Pros - I do like thinking up outfits and mixing stash layers might make the process more exciting.
Cons - This might be "too much planning" for a non-planner.
These are the times that I wish my personality was one who liked to follow plans! Oh well, let's just blame my parents for that and my love of carbs. (I say that knowing my own offspring can blame me for the same things.)
Right now the wardrobe capsule sounds the most fun. I've been thinking of adding more green to my wardrobe and the deep stash has several fabrics that would work for this. Don't hold your breath though about seeing blog updates about this. SQUIRREL! ;) What I really need is a monthly general sewing theme that exactly matches my taste and old stash. Not a tall order or anything. I'm sure some minions are working on it right now. *Snort* It just so happened that all the stars did align in April by providing me with the Stashbusting Sew-a-long theme of Vibrant Color. YES! Take your pastels and shove'em where the sun don't shine. Let's get out some fabric that sear your eyeballs.
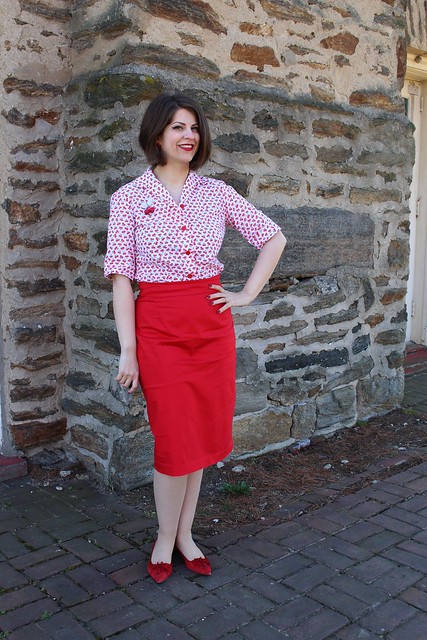
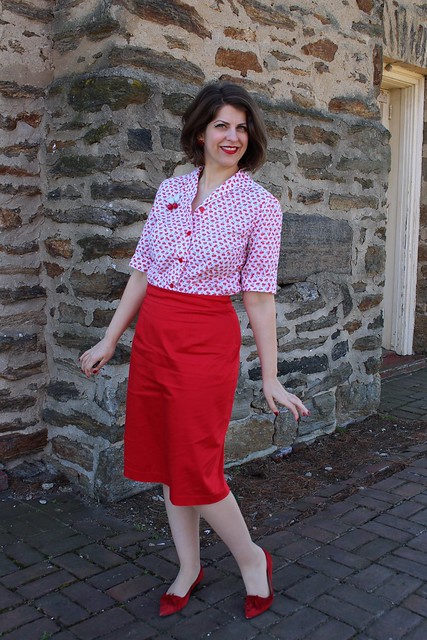
 OK fine, these fabrics don't sear your eyeballs, just make them tingle a bit. Oooo minty! Both these fabrics were from Layer four labeled "Aborted plans and remnants" by our favorite sewing frog. The top is Liberty London Lawn and was supposed to be a Scout tee. The skirt is some stretch sateen that was left over from making a Beignet. They must have been conspiring because one day they fell out of the stash cave together and I realized the colors coordinated. Yes I will make wardrobe decisions based on gravity! That and frogs on pieces of fabric. "Sew me, rib-bit!"
 Since they were both small pieces of fabric I went with my low yardage favorites, Edith and Betsy. You've seen these patterns on the blog several times so I won't bore you with repeating details, just click here if you want them. So now the 4 layer is two pieces of fabric thinner and I have a new outfit with matching shoes. If only sewing the rest of the deep stash could be so easy.
How about you guys? Do you have any tricks that get you sewing the deep stash. Tell me all about them over some cake. :)
Lately I've been pondering over my inability to sew the "orange layers" of fabric in my stash and what to do about it. My sewing records clearly show that with the exception of Butterick 5824, I've been sewing exclusively from layers 1 and 2 this year. I'm not surprised by this since I'm a "non-planner/SQUIRREL!" type of sewer. The new shiny thing is usually going to draw my focus and become the next project.
This is all well and good except there are some older pieces of fabric that I'd actually like to wear. How do I trick myself into sewing those things up with it becoming a chore? Here are the possibilities I'm currently mulling.
1. Have an older stash only month of sewing.
Pros - a clear time frame might help me focus on using this fabric.
Cons - Potentially sew-jo killing if I decide that sewing old fabric sucks.
2. Make a rule that after sewing 2 projects from new fabric, I must sew 1 from old fabric.
Pros - Mixing in some newer fabrics may keep the sew-jo flowing.
Cons - Keeping track of numbers of projects is quickly going to get on my nerves. I can see myself just abandoning the system after a bit.
3. Plan a wardrobe capsule that incorporates old and new fabric.
Pros - I do like thinking up outfits and mixing stash layers might make the process more exciting.
Cons - This might be "too much planning" for a non-planner.
These are the times that I wish my personality was one who liked to follow plans! Oh well, let's just blame my parents for that and my love of carbs. (I say that knowing my own offspring can blame me for the same things.)
Right now the wardrobe capsule sounds the most fun. I've been thinking of adding more green to my wardrobe and the deep stash has several fabrics that would work for this. Don't hold your breath though about seeing blog updates about this. SQUIRREL! ;) What I really need is a monthly general sewing theme that exactly matches my taste and old stash. Not a tall order or anything. I'm sure some minions are working on it right now. *Snort* It just so happened that all the stars did align in April by providing me with the Stashbusting Sew-a-long theme of Vibrant Color. YES! Take your pastels and shove'em where the sun don't shine. Let's get out some fabric that sear your eyeballs.
How about you guys? Do you have any tricks that get you sewing the deep stash. Tell me all about them over some cake. :)
Anatomy of a Fabric Stash
4.24.2015
I know you guys usually read the blog for FO photos, pattern hacks and to mournfully shake your head at my grammar. There will be more of that sort of thing soon, but today we're going to have something a little different. Professor Froggie has prepared a little science lesson for you, so try not to nod off or pass notes to the cute boy in the back. Now focus your eyes forward towards the overhead projector in the front. Really dating myself with an overhead projector reference aren't I? Anyway, I'm going to turn the rest of this blog post over to Professor Froggie so you can get some education.
Hello Class, Professior Froggie here. Today we will be learning about a subject that is near and dear to my heart, fabric stashes. It may look like a random pile of fabric to the non-educated, but it is actually divided into layers that accumulate over time. Now the number of layers in the stash will depend upon location, size of storage area, amount of mad money and if the stasher was born with a hoarding gene. You find that some stashers keep their supply levels down to a mere three layers, while others will proudly/guiltily display the full seven. My job is to teach you about those layers so you can accurately assess the level of "hoarding" going on with your favorite sewists house. For the deeper layers I will give you tips to help prod your stasher into sewing that fabric.
To properly access the maturity of a stash you must first know the names and characteristics of each stash layer. I've constructed this handy graphic to help you in your education. The top layers in yellow are sewn from the most. As the stash deepens the colors darken to show how the fabric is then ignored in favor of upper layers. Finally we get to the red layers that never see the light of day unless an errant child rips apart the stash with glee. Now let's dive deeper into an explanation of each layer.
 Color key
Yellow = Happy fun sewing time and smiles for all.
Orange = Aggravating sewing project that will either bore you to death or make you want to stick a seam ripper in your eye in frustration.
Red = Would rather trade your first born child away than sew that fabric.
Layer 1 - Pure Excitement layer. The top most strata of the fabric stash which could also be named, "Happiness incarnate." This layer houses brand new fabric purchases that have recently been added to the stash. The time frame for a purchase to be considered "brand new" varies among stashers, but usually anything that is less than 6 months old qualifies. The fabric here still has the glitter of fairy dust and frenzied sewing dreams. The giddy feeling of acquisition has not worn off and when ever the stasher takes a look at this layer their face looks a lot like this.

This layer is usually not to thick since the stash will either sew the fabric up right away or leave it until it sinks into layer 2.
Layer 2 - Slightly Seasoned Pretties layer. This strata is comprised of fabric that stasher still loves, but has been around long enough that they no longer consider it a new purchase. While this layer doesn't have the same amount of glamour as the Pure excitement layer, the stasher still cackles with glee when gloating over their precious, precious fabric. They just haven't had the time to sew the fabric up yet. But they will, oh yes they will and it will be glorious. They just have buy some more new fabric first. The thickness of this layer will depend on your personal stashers monthly buying habit, the amount of sewing time they have and if they recently had a someone tell them they have "enough" fabric. More on that later.
Layer 3 - Out of Season Favorites layer. Layer 3 is very similar to Layer 2 with the exception that the fabrics don't match the current season. The stasher concedes that while they think that fabric is great, it still won't be used for several months. They might think, "I'll sew a coat next year when it's cold instead of giving myself heat stroke trying to get blog photos in June." "Or I love to sew a sundress but the -10 temp turning my skin blue might cause some concerns." Note - Some stashers often sew out of season anyway so this layer also holds "Planned projects that are still exciting enough not to be abandoned." That project might not get sewn up for awhile but it's still on the mental list so to speak. Fabric can cycle between layers 2 and 3 for a few years. If it remains unused the fabric may find it's self sinking into Layer 4. Eeek!
Layer 4 - Aborted Plans and Remnants layer. Poor fabrics, once so full of promise that somehow never got sewn up. Maybe the pattern it was bought for didn't work out. Or maybe the stasher was distracted by a new shiny project and never got around to sewing up the already purchased fabric Maybe they just bought so much fabric that they couldn't possibly sew it all this year. "I had to buy all the pretties. What if I regretted it later" - they cried. (Dangers of the hoarding gene) This layer also houses large-ish pieces of fabric left over from other projects. No self respecting stasher can part with "good fabric" unless it's a tiny bit. Now all this yardage makes the stasher think, "What the heck am I going to make with this." I recommend having them join sewing groups with general themes, having them rifle through their patterns and pointing out fabrics that coordinate. You can also throw in the carrot of new matching shoes if it gets them cutting into that fabric.
Layer 5 - Tricksy Fabrics layer. The home of all those hard to sew fabric that don't lend themselves to quick projects. For example only people with super hero skills or are bat-shit crazy think "I'll just quickly whip up a silk chiffon top." This layer might be full of fabrics the stasher thinks are beautiful, but can't quite put up with the hassle of sewing them. "Ugh, who wants to lay out a bunch of paper to cut some silk. I'll just sew a cotton dress and eat cake instead." - I have often overheard. Some times the stasher continues to buy these sorts of fabrics with abandon swelling this layer to unruly proportions. If this happens I suggest tricking them into keeping records so that they will notice their sewing patterns. Then they may just give themselves a personal ban on certain fabric types. Then steal some of that stash to sleep on because everyone deserves silk sheets.

Layer 6 - Regrettably Changed Taste layer. One of the dangers long time stashers run up against is finding that there fabric tastes change over time. A certain stasher I happen to live with once bought, sewed and wore a lot of rayon jersey. Now not so much, but the stash is still full of them. You might be tempted to point out that this layer shows the stasher should buy less so that fabrics gets used up before they strike out on some other style whim. Don't Do This! It only aggravates them and causes what I like to call a "spite purchase." (Same goes for spouses/children of stashers using the phrase "You already have enough fabric." You are only making the problem worse.) Instead leave the stasher to come to the conclusion themselves that this fabric should be rehoused either via reselling or donation.
Layer 7 - WTF was I Thinking layer. Fabric that was bought "on sale" that really shouldn't have been. Colors that make the stasher look like they are battling a bad case of food poisoning. Things inherited from other people that on second thought should have gone to the dump instead. Stashers are a funny lot that sometimes hold on to things they shouldn't. Take their hand in your hand/paw and say, "It's all right, everyone makes mistakes. You can let that fabric go." Then help them pack it up in boxes to donate at the nearest facility. If they protest loudly then let them keep a few yards to "make muslins" and then take the rest out when they are binge watching Netflix's "Daredevil." (Side note - if they are watching 2003 Daredevil staring Ben Affleck then do them a favor and destroy that DVD first, then dispose of the fabric. No one needs to subject themselves to that garbage.)
And that concludes my lecture about the strata of fabric stashes. I hope it either helps you in diagnosing your own stash levels or helps loved ones interact with your stash in the proper way. Class dismissed!
P.S. Heather here - I put the entire Etsy shop on sale for the month of April. If you like to help me rehouse some of my "Regrettably Changed Taste layer" then click here. Thanks to those of you who already have. :)
Hello Class, Professior Froggie here. Today we will be learning about a subject that is near and dear to my heart, fabric stashes. It may look like a random pile of fabric to the non-educated, but it is actually divided into layers that accumulate over time. Now the number of layers in the stash will depend upon location, size of storage area, amount of mad money and if the stasher was born with a hoarding gene. You find that some stashers keep their supply levels down to a mere three layers, while others will proudly/guiltily display the full seven. My job is to teach you about those layers so you can accurately assess the level of "hoarding" going on with your favorite sewists house. For the deeper layers I will give you tips to help prod your stasher into sewing that fabric.
To properly access the maturity of a stash you must first know the names and characteristics of each stash layer. I've constructed this handy graphic to help you in your education. The top layers in yellow are sewn from the most. As the stash deepens the colors darken to show how the fabric is then ignored in favor of upper layers. Finally we get to the red layers that never see the light of day unless an errant child rips apart the stash with glee. Now let's dive deeper into an explanation of each layer.
Yellow = Happy fun sewing time and smiles for all.
Orange = Aggravating sewing project that will either bore you to death or make you want to stick a seam ripper in your eye in frustration.
Red = Would rather trade your first born child away than sew that fabric.
Layer 1 - Pure Excitement layer. The top most strata of the fabric stash which could also be named, "Happiness incarnate." This layer houses brand new fabric purchases that have recently been added to the stash. The time frame for a purchase to be considered "brand new" varies among stashers, but usually anything that is less than 6 months old qualifies. The fabric here still has the glitter of fairy dust and frenzied sewing dreams. The giddy feeling of acquisition has not worn off and when ever the stasher takes a look at this layer their face looks a lot like this.
This layer is usually not to thick since the stash will either sew the fabric up right away or leave it until it sinks into layer 2.
Layer 2 - Slightly Seasoned Pretties layer. This strata is comprised of fabric that stasher still loves, but has been around long enough that they no longer consider it a new purchase. While this layer doesn't have the same amount of glamour as the Pure excitement layer, the stasher still cackles with glee when gloating over their precious, precious fabric. They just haven't had the time to sew the fabric up yet. But they will, oh yes they will and it will be glorious. They just have buy some more new fabric first. The thickness of this layer will depend on your personal stashers monthly buying habit, the amount of sewing time they have and if they recently had a someone tell them they have "enough" fabric. More on that later.
Layer 3 - Out of Season Favorites layer. Layer 3 is very similar to Layer 2 with the exception that the fabrics don't match the current season. The stasher concedes that while they think that fabric is great, it still won't be used for several months. They might think, "I'll sew a coat next year when it's cold instead of giving myself heat stroke trying to get blog photos in June." "Or I love to sew a sundress but the -10 temp turning my skin blue might cause some concerns." Note - Some stashers often sew out of season anyway so this layer also holds "Planned projects that are still exciting enough not to be abandoned." That project might not get sewn up for awhile but it's still on the mental list so to speak. Fabric can cycle between layers 2 and 3 for a few years. If it remains unused the fabric may find it's self sinking into Layer 4. Eeek!
Layer 4 - Aborted Plans and Remnants layer. Poor fabrics, once so full of promise that somehow never got sewn up. Maybe the pattern it was bought for didn't work out. Or maybe the stasher was distracted by a new shiny project and never got around to sewing up the already purchased fabric Maybe they just bought so much fabric that they couldn't possibly sew it all this year. "I had to buy all the pretties. What if I regretted it later" - they cried. (Dangers of the hoarding gene) This layer also houses large-ish pieces of fabric left over from other projects. No self respecting stasher can part with "good fabric" unless it's a tiny bit. Now all this yardage makes the stasher think, "What the heck am I going to make with this." I recommend having them join sewing groups with general themes, having them rifle through their patterns and pointing out fabrics that coordinate. You can also throw in the carrot of new matching shoes if it gets them cutting into that fabric.
Layer 5 - Tricksy Fabrics layer. The home of all those hard to sew fabric that don't lend themselves to quick projects. For example only people with super hero skills or are bat-shit crazy think "I'll just quickly whip up a silk chiffon top." This layer might be full of fabrics the stasher thinks are beautiful, but can't quite put up with the hassle of sewing them. "Ugh, who wants to lay out a bunch of paper to cut some silk. I'll just sew a cotton dress and eat cake instead." - I have often overheard. Some times the stasher continues to buy these sorts of fabrics with abandon swelling this layer to unruly proportions. If this happens I suggest tricking them into keeping records so that they will notice their sewing patterns. Then they may just give themselves a personal ban on certain fabric types. Then steal some of that stash to sleep on because everyone deserves silk sheets.
Layer 6 - Regrettably Changed Taste layer. One of the dangers long time stashers run up against is finding that there fabric tastes change over time. A certain stasher I happen to live with once bought, sewed and wore a lot of rayon jersey. Now not so much, but the stash is still full of them. You might be tempted to point out that this layer shows the stasher should buy less so that fabrics gets used up before they strike out on some other style whim. Don't Do This! It only aggravates them and causes what I like to call a "spite purchase." (Same goes for spouses/children of stashers using the phrase "You already have enough fabric." You are only making the problem worse.) Instead leave the stasher to come to the conclusion themselves that this fabric should be rehoused either via reselling or donation.
Layer 7 - WTF was I Thinking layer. Fabric that was bought "on sale" that really shouldn't have been. Colors that make the stasher look like they are battling a bad case of food poisoning. Things inherited from other people that on second thought should have gone to the dump instead. Stashers are a funny lot that sometimes hold on to things they shouldn't. Take their hand in your hand/paw and say, "It's all right, everyone makes mistakes. You can let that fabric go." Then help them pack it up in boxes to donate at the nearest facility. If they protest loudly then let them keep a few yards to "make muslins" and then take the rest out when they are binge watching Netflix's "Daredevil." (Side note - if they are watching 2003 Daredevil staring Ben Affleck then do them a favor and destroy that DVD first, then dispose of the fabric. No one needs to subject themselves to that garbage.)
And that concludes my lecture about the strata of fabric stashes. I hope it either helps you in diagnosing your own stash levels or helps loved ones interact with your stash in the proper way. Class dismissed!
P.S. Heather here - I put the entire Etsy shop on sale for the month of April. If you like to help me rehouse some of my "Regrettably Changed Taste layer" then click here. Thanks to those of you who already have. :)
Sewing Notes - Simplicity 2195
4.14.2015
In my last post I said that Simplicity 2195 had good bones but needed some tweeks to meet my tastes. The main problem with the pattern is the odd drafting of the collar, which I frankly feel was done to "dumb down" the pattern.
When it comes to shirt collars my favorite construction is a separate stand and collar. I like how the collar folds when there is a seam involved. That being said, if a vintage look is what I have in mind then an "all in one collar" and facing is the way to go. I know that the collar is going to sit against the body differently, but that's a decent trade off for the vintage style of the garment.
Now let's look at the collar pieces for Simplicity 2195 to see how this "trade off" went from being acceptable to head scratching nonsense. (In my own opinion, of course.)

Here are the two collar pieces. The under collar has been drafted in the standard way of an "all in one collar." I would expect this piece to be marked collar and say cut 2. Instead the upper collar is a separate piece that also has part of the facing attached. The front facing is pieced because if you cut the collar on the straight grain the facing will be on the bias. The drafter correctly thought an entire front facing on the bias would be bad news and separated the pieces right under the first buttonhole placement.
To sew the garment you first attach the under collar to the neckline, much as you usually would.

Then the upper collar and facing pieces are sewn together and the outer edge of the facing is turned over and sewn. Usually I ignore this sort of finish and run a line of overlock on the facing instead. This time it was important to get rid of that seam allowance and you'll see why in a minute.

Then the entire outer edge of the shirt front and collar are sewn, trimmed and pressed. This leaves you with the upper edge of the collar not attached to anything.

To finish off the area, the edge of the collar is slip stitched to the seam allowance of the under collar. This is why the facing edge had to be finished with a stitch and turn. Otherwise the two areas would not match up.

In the final shirt the overall look is the same as a regular "all in one collar," but to the wearer it feels different. Like I said in the original review post the facings want to flip out most of time. They were drafted narrower so that the upper collar could be slip stitched in place. The lack of seam on the upper collar also affects how the collar folds, or more accurately doesn't want to fold. I had to press the heck out of it to get it to look semi-right and still it irks me.

My plans for this pattern are to figuratively chuck the upper collar piece and cut two of the under collar. Then I'll draft a new back and front facing at a slightly wider width so that they don't flip out all the time. With a slightly shifted button placement, this pattern should work great for me. Now I just gotta put it back on the sewing list...under a million dresses.
Cherry Picking Shirt
4.13.2015
Is there a type of garment that you always buy patterns for? Even though you know that the stash doesn't need another. You might resit for a few minutes but a new pattern finds it's way home with you in the end. I'm like that with button down shirts. The variations between them are usually small but I love them just the same.
 I also love bitchy looking fashion illustrations, so it's no wonder that Simplicity 2195 was recently added to the pattern collection. These girls are like, "Sew? We don't sew, we have people sew for us and bring us drinks. And we don't eat cake...ever. *With judgmental stare at my waistline.*"Ha haa haa! You judgy snitches are a riot, excuse me while I finish my cake.
 Not too much to report on the fitting and sewing process on this one. My fitting process on button down shirts works for most patterns and this one was no exception. (All the fitting details are in the normal spot below.) I will mention that the ease in the bust looks just fine with sleeves on, but wouldn't work for the sleeveless version. There would be way too much armhole gapping without any adjustments.
 With the sleeves on the shirt has an area appropriate blousey feel without being oversized. I did feel the back had a little too much fullness and converted the tucks into fish eye darts to take some out.

Pattern
Simplicity 2195 (This one seems to be easy to get your hands on.)
Fabrics used
Vintage flocked cotton that was probably also a polyester blend. It has a stink that is only now fading. Sneaky cherries.
 Pattern changes/alterations
1. Dropped bust dart 1 1/2".
2. Shaved off 1/4" at the top of the side seam and added the same amount in the hip area.
3. It felt like the pattern was drafted for a longer torso, but I didn't want to shorten the length. Instead I moved the top of the tucks up 3/4".
4. Turned the back tuck into a fish eye dart.
5. Made a 1" sway back adjustment.
6. Made a 1/2" forward shoulder adjustment to the sleeve cap.
7. The pattern does not have a shoulder seam so my usual 1/2" wide upper back and forward shoulder adjustment had to be done creatively. Usually I would add the extra width to the lower part of the back and then put a dart in the shoulder seam of the back yoke.
 Here's a picture of my adjustment before the excess areas were cut off. The lower part of the back was adjusted like normal. Then I slashed and spread the entire yoke 1/2", so that the two back seams matched. On the front of the yoke I took off 1/2" at the shoulder edge so that those seams would match. For the forward shoulder adjustment I moved the yoke seam line forward and reduced the front as normal. The shoulder line mark on the pattern also needs to be moved 1/2" forward but that's not shown here.
Confessions/Advice
- I checked the suggested buttonhole placement before sewing them and decided the placement was great. After the garment was completed I changed my tune and wished that the buttons had been shifted lower.
- Pattern is only drafted to have 3 buttons, I added some extra on the lower portion of the blouse.
Husband Comment
"I like it. I like the apples, the pairs of apples." - They're cherries, are we talking about the same thing?
My Final Thoughts
I think this pattern has good bones, but that it needs further modifications before it matches my preferences. Having the collar and facing as one unit doesn't work for me. It doesn't fold the way a collar with a seam does and the facing want to flip out. I also have an issue with wearing tucks. In theory they are fine, but on my body I'd rather have a fish eye dart. All these issues are easily fixable on the pattern. I should go back and tweak it and make another version. In conclusion, decent first attempt but needs a little more work. Hey don't we all. ;)
I'm pretty pleased with the body but have some issues with the collar. Instead of being being drafted like a standard all in one collar, the upper collar and facing are attached. I feel this shortcut keeps the collar from folding over nicely. It also limits how low you can button the blouse before the facings start flipping out. If you like the period appropriate button placement then this wouldn't be an issue, but for me it is. (I'll be discussing this further in a sewing notes post.)
Simplicity 2195 (This one seems to be easy to get your hands on.)
Fabrics used
Vintage flocked cotton that was probably also a polyester blend. It has a stink that is only now fading. Sneaky cherries.
1. Dropped bust dart 1 1/2".
2. Shaved off 1/4" at the top of the side seam and added the same amount in the hip area.
3. It felt like the pattern was drafted for a longer torso, but I didn't want to shorten the length. Instead I moved the top of the tucks up 3/4".
4. Turned the back tuck into a fish eye dart.
5. Made a 1" sway back adjustment.
6. Made a 1/2" forward shoulder adjustment to the sleeve cap.
7. The pattern does not have a shoulder seam so my usual 1/2" wide upper back and forward shoulder adjustment had to be done creatively. Usually I would add the extra width to the lower part of the back and then put a dart in the shoulder seam of the back yoke.
Confessions/Advice
- I checked the suggested buttonhole placement before sewing them and decided the placement was great. After the garment was completed I changed my tune and wished that the buttons had been shifted lower.
- Pattern is only drafted to have 3 buttons, I added some extra on the lower portion of the blouse.
Husband Comment
"I like it. I like the apples, the pairs of apples." - They're cherries, are we talking about the same thing?
My Final Thoughts
I think this pattern has good bones, but that it needs further modifications before it matches my preferences. Having the collar and facing as one unit doesn't work for me. It doesn't fold the way a collar with a seam does and the facing want to flip out. I also have an issue with wearing tucks. In theory they are fine, but on my body I'd rather have a fish eye dart. All these issues are easily fixable on the pattern. I should go back and tweak it and make another version. In conclusion, decent first attempt but needs a little more work. Hey don't we all. ;)
Sewing Notes - Advance 9427
4.04.2015
Hey there folks, from time to time I'll be doing an extra post on a pattern called Sewing Notes. It's going to be a general catch all for things I find interesting, but aren't essential to the review blog post. That way the reviews don't get monstrously big and the segment can be easy skipped if it's not your cup of tea.
Now that you know what this is all about, let's talk about the scalloped neckline on Advance 9427.
 After you sew for awhile you start to make assumptions about how patterns are going to be drafted/garments are going to be sewn. There might be several ways to do that same thing, but the possibilities are not endless. You try a few techniques and settle for one that works for you.
Since I'm a fan of scalloped necklines, I do have a favorite sewing technique for making them. My method is to take the facing and mark all the scallop valleys so there there is a clear pivot. Then I can easily sew them using the throat plate guide as long as I use a short stitch and take it slow.
I wasn't expecting to have to change this process when purchasing Advance 9427. Surely the pattern would be drafted the same as the other's in my stash, with scallops on both the bodice and facing pieces. Nope! This dress had a little surprise for me waiting for me.
 On this pattern the scallops only appear on the neckline facings, where as the bodice pieces have a smooth edge. The seamstress is supposed to match the CF/CB circles and the shoulder notches to sew the two pieces together. I have to admit that the first time I pulled this pattern out of the envelope and unfolded a bodice piece there was a moment of panic. "Where the heck are my scallops at Advance? You dirty tricksters baited and switched me!!" Then my brain clucked into gear and remembered to check the facing patterns before losing all my shit. Lesson learned, don't try to start new projects late at night.
I've spent some time hypothesizing over why Advance chose to do it this way. Did it make it easier to grade the pattern or did they think it was easier for home sewers to use? It does give you the option of an alternate neckline if you're savvy enough to draft another set of facings. (I'm tempted to do this.)
In the interest of trying something new, I decided to sew the neckline the way the designer intended ....well kind of.
 Since it was the 50's the instructions told me to cut the facing piece out of sewn in interfacing and attach it to the bodice. I went the modern route and attached fusible interfacing to the facing.
Next the CF/CB seams and shoulder seams are sewn on both the bodice and facing pieces. After those seams are pressed, the facing edge is supposed to be finished with a stitch and turn. I when the modern route here too and overlocked the edges. With all those things sorted, it was time to match the two pieces face to face and sew the scallops.
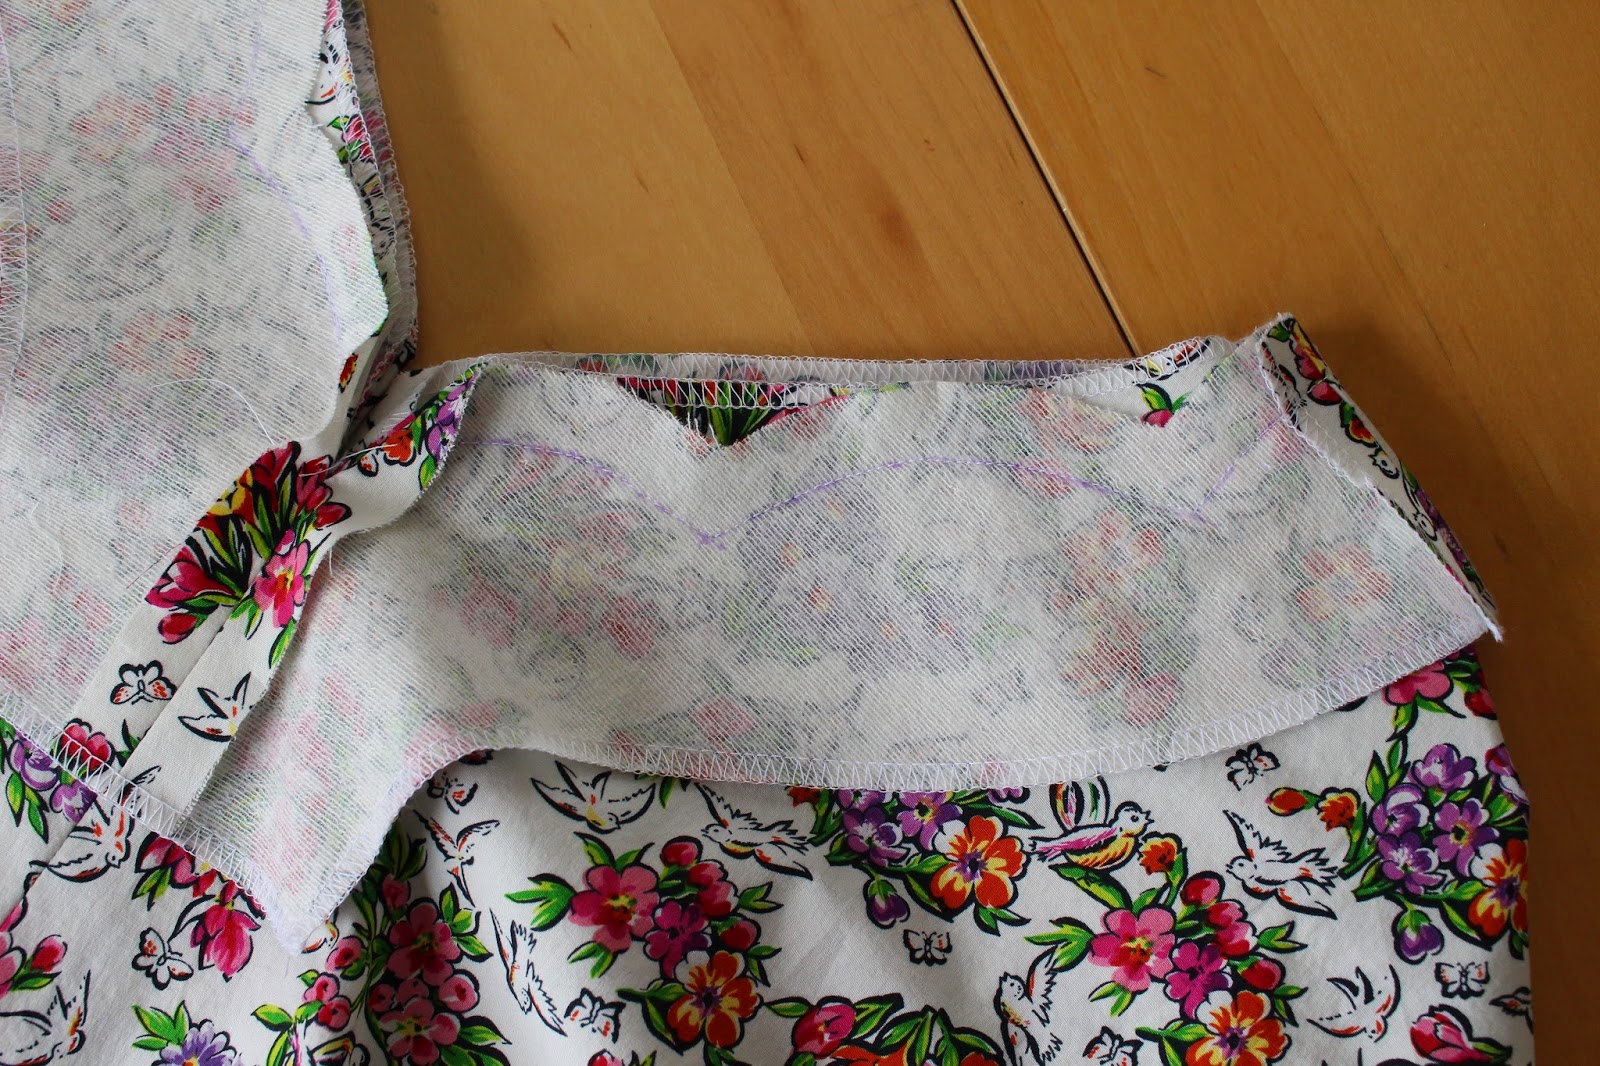 On the good side I didn't need to worry about matching curves between the pieces. On the bad side I couldn't use the throat plate guide to sew the seam. I used a purple disappearing marker to draw in the stitch line on the facings. This made the process easy other than getting the CF/CB joins nice and neat.
 Once the scallops are sewn the directions instruct you to trim the bodice neckline to match the facing. Then you're to clip the scallop valley of each scallop and press the neckline Let me submit that trimming and clipping are a good start, but if you want really nice scallops then you need to do some seam grading.
 I went back and graded the fused facing side down to 3/16" and the bodice edge down to 3/8." (You'd want to have a bigger seam allowance if the fabric is prone to fraying. Cotton sateen you can cut pretty close.)
 Now that the seam allowances were trim, I moved to the ironing board with my point turner. I like to run the turner along the top of the scallop to make sure it's fully pushed out.
 With all the work done, now it was time to press the neckline! (I'm in the silk organza press cloths fan club.)
 Ta Da! Perfectly pressed scallops. I think Mary Poppins would approve.
Now that you know what this is all about, let's talk about the scalloped neckline on Advance 9427.
Since I'm a fan of scalloped necklines, I do have a favorite sewing technique for making them. My method is to take the facing and mark all the scallop valleys so there there is a clear pivot. Then I can easily sew them using the throat plate guide as long as I use a short stitch and take it slow.
I wasn't expecting to have to change this process when purchasing Advance 9427. Surely the pattern would be drafted the same as the other's in my stash, with scallops on both the bodice and facing pieces. Nope! This dress had a little surprise for me waiting for me.
I've spent some time hypothesizing over why Advance chose to do it this way. Did it make it easier to grade the pattern or did they think it was easier for home sewers to use? It does give you the option of an alternate neckline if you're savvy enough to draft another set of facings. (I'm tempted to do this.)
In the interest of trying something new, I decided to sew the neckline the way the designer intended ....well kind of.
Next the CF/CB seams and shoulder seams are sewn on both the bodice and facing pieces. After those seams are pressed, the facing edge is supposed to be finished with a stitch and turn. I when the modern route here too and overlocked the edges. With all those things sorted, it was time to match the two pieces face to face and sew the scallops.
Put on your Easter Bonnet and Dress
4.03.2015
Hold on, where is my Easter Bonnet? I had it before visiting the Easter Bunny to top off my basket and waaaait.....That Darn Rabbit! Always stealing my hats and cutting ear holes in them. Well that hat's ruined now and I'm gonna need a lot more chocolate than this to forget all about it. Stupid hat snatching Rabbits, guess I'm lucky we aren't the same shoe size.
 Fun headgear aside, Easter usually isn't a sewing event for me. It belongs in the pantheon of chocolate gorging extravaganzas, yes. But as far as outfit planning goes, I usually wear a recently sewn dress and call it good. This year was a bit different because one of my newer vintage pattern acquisitions begged to be sewn up in the Springiest fabric in the stash. Springiest? Is that a real word or does this fabric just demand it's creation? Flowers and Birds and Butterflies, Oh My! It's practically screaming, "Sew me into a Advance 9427 Heather. Oh please, oh please. Then kindly cover me with an apron before you go all Cookie Monster on some chocolate."
 Advance 9427 has been flashed on the blog before but this time let me mention the design details.
Here's the description from the envelope, "One piece dress with a special talent for looking right anywhere....under a coat or under the sun. Slim skirted or full skirted, you'll love the way this scallop necked, short sleeved beauty fits and flatters you." - Fine ad copy Don Draper, go get yourself and Old Fashioned and throw some money at Peggy's face. Or in my face, as long as it's enough to buy something nice.
Actual design details:
-Bodice with scalloped neckline on both front and back, bust and waist darts.
-Bias bound kimono sleeves.
-View 1 has a 7 paneled full skirt. Only the side front and side back panels are gathered.
-Dress has side seam zip entry, probably to make sewing the back neckline easier.
-And hey look, the almighty technical drawing. It's not a proper sewing party without one of those.
 All in all some easy sewing as long as you properly mark the scallop stitch line. No worries then because I've got Frog to sort out those details.
OK, so far we have easy to sew stretch cotton sateen and a pattern with easy to sew details. So how is fitting going to go? Guess what, sewing back to back Advance patterns made that easy too. Comparing the already altered Advance 9441 pieces with 9427 clearly showed me some of the adjustments that needed to be done. Most notably 9427 was drafted with a lot more length in both the bodice and the skirt. After those changes were made, I just had to drop in my other standard fitting adjustments to get a good fit.
 The only hitch to this process was coming up with a cutting layout for the pattern. Upon spreading out the fabric, I found my memory was completely wrong about it's width and length. I would have staked my first born's soul that there were 4 yards of this fabric on the board. Nope! Past Heather only bought 3 yards of fabric and it was a lot narrower than 60" wide. Good thing I wasn't making any deals with the devil over stash usage. If was making the dress as drafted 3 yards wouldn't have worked. Happily my preferred skirt length of 27"meant it was possible if I came up with my own cutting layout. With my advanced "pattern Tetris skills" I was just able to fit all the pieces in AND cut all the skirt panels in the same direction. Now I can save my first born's soul for something really important, like a sweet pair of shoes.

Pattern
Advance 9427. Don't see this one available for purchase on Etsy at the moment.
Fabrics used
Stretch Cotton Sateen from Emmaonesock.com. According to last year's handy dandy spreadsheet this fabric was purchased in August. That's a pretty decent stash overturn time for me.

Pattern changes/alterations
1. Dropped bust dart 1.5" and shortened the waist dart 3/4".
2. Shortened bodice 5/8".
3. Make a 1/2" forward shoulder adjustment.
4. Added 1/4" to the side seams around the waist area.
5. Shortened skirt length 2".
Confessions/Advice
-After finding the waist roomy on Advance 9441, I cut the amount of extra ease added to the waist area in half. Thanks to the lycra in the cotton the waist is still too big on this dress. Maybe I don't need to add ease to 28" waist dresses after all.
 -Every time a vintage bust dart needs to be dropped 1.5 inches, I remember Mary's line about "amusingly improbable dart locations" and snort giggle a bit. It's better than cursing my saggy bewb genes.
- Just like the previous Advance pattern, the skirt was drafted to be mid calf on a women of regular height. Not the "below the knee" look of the illustration. With my alterations the final skirt length of the garment is 27".
- This dress also has a deep 2.5" hem allowance. I found that it needed to be eased in a bit on the larger pieces. So I attached some lace to the skirt edge, ran some gathering stitches and hand slip stitched the hem in place.
 - It's starting to look like my #vintagepledge of sewing 3 vintage patterns was a little conservative. This pattern is garment #2 and I may have already completed #3. Might be time to edit the pledge.
Husband Comment
"Hey Easter Girl! I like bumpy plunge necklines. Wait, are those new shoes?" Nope! See blog post from last year for photographic proof. *Shoves new lobster sandals under the sofa*
My Final Thoughts
A former owner of the pattern wrote on the envelope "Easy to make and neat looking." Yes, I completely agree, especially in super easy to sew stretch cotton. I'm quite the fan of the neckline and may mash it with other patterns in the future. Having a pencil skirt version would also be very nice. Gotta give the boys in the sea food department something fun to look at, you know. Now I have to run off and raid Desmond's Easter basket for chocolate while he's sleeping. Everyone have a happy and candy filled holiday.
 P.S. - I promise never to accidentally leave my camera on a slower shutter speed on a windy day again. Somehow I neglected to notice any of the blurriness when checking photos mid shoot. Still have plenty to learn about the new camera.
Here's the description from the envelope, "One piece dress with a special talent for looking right anywhere....under a coat or under the sun. Slim skirted or full skirted, you'll love the way this scallop necked, short sleeved beauty fits and flatters you." - Fine ad copy Don Draper, go get yourself and Old Fashioned and throw some money at Peggy's face. Or in my face, as long as it's enough to buy something nice.
Actual design details:
-Bodice with scalloped neckline on both front and back, bust and waist darts.
-Bias bound kimono sleeves.
-View 1 has a 7 paneled full skirt. Only the side front and side back panels are gathered.
-Dress has side seam zip entry, probably to make sewing the back neckline easier.
-And hey look, the almighty technical drawing. It's not a proper sewing party without one of those.
OK, so far we have easy to sew stretch cotton sateen and a pattern with easy to sew details. So how is fitting going to go? Guess what, sewing back to back Advance patterns made that easy too. Comparing the already altered Advance 9441 pieces with 9427 clearly showed me some of the adjustments that needed to be done. Most notably 9427 was drafted with a lot more length in both the bodice and the skirt. After those changes were made, I just had to drop in my other standard fitting adjustments to get a good fit.
Pattern
Advance 9427. Don't see this one available for purchase on Etsy at the moment.
Fabrics used
Stretch Cotton Sateen from Emmaonesock.com. According to last year's handy dandy spreadsheet this fabric was purchased in August. That's a pretty decent stash overturn time for me.
Pattern changes/alterations
1. Dropped bust dart 1.5" and shortened the waist dart 3/4".
2. Shortened bodice 5/8".
3. Make a 1/2" forward shoulder adjustment.
4. Added 1/4" to the side seams around the waist area.
5. Shortened skirt length 2".
Confessions/Advice
-After finding the waist roomy on Advance 9441, I cut the amount of extra ease added to the waist area in half. Thanks to the lycra in the cotton the waist is still too big on this dress. Maybe I don't need to add ease to 28" waist dresses after all.
- Just like the previous Advance pattern, the skirt was drafted to be mid calf on a women of regular height. Not the "below the knee" look of the illustration. With my alterations the final skirt length of the garment is 27".
- This dress also has a deep 2.5" hem allowance. I found that it needed to be eased in a bit on the larger pieces. So I attached some lace to the skirt edge, ran some gathering stitches and hand slip stitched the hem in place.
Husband Comment
My Final Thoughts
A former owner of the pattern wrote on the envelope "Easy to make and neat looking." Yes, I completely agree, especially in super easy to sew stretch cotton. I'm quite the fan of the neckline and may mash it with other patterns in the future. Having a pencil skirt version would also be very nice. Gotta give the boys in the sea food department something fun to look at, you know. Now I have to run off and raid Desmond's Easter basket for chocolate while he's sleeping. Everyone have a happy and candy filled holiday.
Subscribe to:
Posts (Atom)
