January goal check and February plans

1.31.2013

It's the last day of January and how we doing on those beginning of the year sewing goals?  Pretty darn good!  Seven garments made from stash (sexy dress not blogged yet, STILL waiting for undergarments, grrrrrr) and a few small projects also made from stash.  Let's all do the happy dance.

I'm thoroughly enjoying the Stashbusting sew-a-long group on flickr.  It's never too late to join us......One of Us, One of us.

Plans for February....so far
1. Enter the PR RTW knock off contest and knock off this cute nightgown.
Got my materials all ready, I didn't have enough yardage in a solid color in the stash so this was a new purchase. Oooooooo bad, not really it was cheap.  Planning on using the Tiramisu pattern from sewing cake as my pattern hacking base. 
Model knit from high end fabrics on ebay.  Lace from Mary not Martha on Etsy.

2. Make this easy peasy kimono sleeve coat.
I muslined it up last year and then got distracted by something else and never got it made up.  Purchased some faux chinchila on sale in December so I guess that's not really stash either.  Maybe I should stop patting myself on the back about using stash.
Pet me!
3. Speaking of stash the monthly theme for the stashbusting sew-a-long is Love.... meaning sew something for someone else.  I have an old high school friend who is always complementing me on my FO pics and hinted she'd love a clutch.  A clutch she shall have, just need to decide what awesome scraps to use.

4. Finish knitting up my cashmere beret.  Ummm this was supposed to be done this month but things don't get done if you don't work on them. It is stash......just not fabric stash.
Can you see the checkerboard pattern? I can't either.
5. Finish my bra kit and make some more once the kinks are worked out.  
This week I seemed to get the fitting problems fixed on my bra muslin and thought I could bust out the real one yesterday.  Didn't happen that way.  Let's just say elastic is a trixsy snitch. I might have also decided to change a bunch of things mid project as I'm wont to do.  Got a lot more black on black seam ripping still to do.   Still its a mostly fun experience and I want to make more.....lots and lots more.

Scraptastic

1.28.2013

Seems I was bit by the scrap busting bug.......
Howdy Partner, how about some gun slinging PJ's.
Now I can finally stop saving all those semi large, but not large enough for a garment, knit scraps.
Reusable wipes for dirty kids.  Knit Jersey on one side, bamboo fleece on the other.

Also there are a couple small projects I've been putting off for years.......
Laundry bag for my son's dirty clothing. Fabric left over from redoing the ironing board cover,

Ummm and this one too....
Tote bag out of hemp/cotton bought for just this project.


Hmmmmm I might need a 12 step program.

Babies got some brand new PJ's

1.25.2013

Hi there, I'm trying to watch Sesame Street but my crazy mommy wants to take pictures. I'm not your baby model!
Fine if you're going to keep taking pictures you can look at my back. I got things to do.
Like suck on my hand, mmmm my hand is delicious.

Boom! More PJ's are done!  Nothing like a few quick knit projects to make you feel like a productive sewer. Yeah I'm looking at you sexy dress, AKA hand sewing time suck. OK, fine, you're pretty so let's just move on.

Peek-a-boo pattern shop gets a big thumbs up from me for their winter PJ set.  I loved everything about this pattern.  One seam pants, easy ribbing binding and nice clear instructions with photos.  They even give you a chart with suggested elastic lengths for each size.  A certain pattern (that will go unmentioned) didn't bother to give me that information when I making Xmas clothing for my niece and nephew.  Sometimes we don't have the child around to measure pattern makers, give me a suggestion.  So long story short, peek-a-boo patterns rocks!

The fabric was acquired from the Ottobre shop a couple years ago and did get made up into a Jalie onesie for my boy back when he was a smaller version.  There was just enough left over to cut a 3T size of the PJ set.  The ribbing was from my usual children's supplier Lilbabythangs.  I just wish she sold bigger cuts ribbing cause I want some for my projects.
I pretty much followed the directions exactly just substituting in the coverstitch machine for any zigzag or twin needle parts. My son wears 2T right now but this fabric was too pricey to get a 2-3 months of wear out of them.  Sized up so he can wear them the entire winter next year.
Best of all this project was under a yard so it qualifies for this month's stashbusting sew-a-long challenge!  Watch out, I'm on a stash busting roll. 

On the sewing table

1.24.2013

Butterick 5814 is done, waiting for undergarments for it's debut photo shoot.  Speaking of undergarments bra muslins happen to be on my sewing table. Seems I'm working on 2012 sewing resolutions as well.
Pin-up girls classic bra 1235

There also seems to be a PJ party going on......

PJ's for the boy using Peek-a-boo pattern shop winter PJ's pattern
Left over jersey from the Ottobre shop cia 2010

On the sewing table this morning but off it now.  PJ top for me.
Stashed Spoonflower organic interlock with print from malien00
Another version of Sewaholic Renfrew pattern but with 1x2 ribbing for the binding.  The ribbing fabric behaved differently in every location and I had to remove different amounts of length from the pattern.  The breakdown was 3" off the neck binding, 2" off the hem binding and 1" off the sleeve binding.  At least that's pretty easy to remember. Now excuse me I have some reading to do.

Still Hand Sewing

1.21.2013

Inching ever closer to finishing Butterick 5814/sewing dare.  I took Gertie's advice and hand sewed twill tape onto all the necklines. Concerned about my silk being too light weight for this design I also fused Pam's pro-tricot interfacing onto all the pieces.  This gives the fabric a little more body while retaining the drape, I'd say it behaves like a 4ply silk now.

If I had one bone to pick about the instructions it would be that the boning segment is a little vague. Fortunately I'd bought Gertie's bombshell dress course from craftsy where she did a step by step chapter on inserting spiral steel boning.  I am using spiral steel boning since RTW has taught me that feather weight boning buckles under the weight of my bust.

The basic steps are to....
1. Mark where you want the boning, in the case of butterick 5814 the pattern will tell you where to put it.
2. Then cut the boning to size.  I lucked out here because my boning lengths corresponded with precut lengths offered by corsetmaking.com.  All darts were 6" and the longer back pieces were 8.5".
3. Cut the boning casting to be slightly longer than the boning, about 1/8" on each side.  Sew the vertical sides of the casting to the lining with an edge stitch foot.  Make sure you leave a 5/8" seam allowance on the lining cause you can't sew through spiral steel.  (I accidentally did and had to get a pair of pliers to remove the broken needle point.)
4. Insert boning into the castings and sew the ends closed with a zipper foot.  Ta Daaaa your boning is attached!

Everything else is straight forward,  pleating, sewing, sewing, pleating, hand sew, hand sew, hand sew......hand sew.
Still need to hand sew the hem, the waist stay, hook and eye and probably the zipper seam allowance.  After all that... shoe shopping.

Stash busting with TNT's

1.17.2013

I can't quite be a monogamous sewer so there are always a few projects going on behind the scenes.
Item one - another cowboy shirt, this time in stashed Liberty of London Tara with coordinating top-stitching.

Construction wise it's exactly the same as the black one, the fabric choice just gives it a softer feel.

Item two- a Renfrew with a modified cowl drafted by me, rescued from last October's FO box. Made up in some stashed rayon/lyrca knit from emmaonesock.com.

The only change to the pattern is to make the neckline 2" deeper than the V neck point and round out the V a bit.  Then draft a narrower/longer cowl to fit it,  35.5" x 11", cowl folds in half to be 5.5".

To keep the stash busting rolling along I've joined the 2013 Stashbusting sew-a-long hosted by Cindy and Emily.  My pledge was to sew up 12 pieces of stashed fabric during the year.  Not sure if I should count the 3 garments already made or not. ;)

Cindy and Emily came up with the fun idea of giving each month of the year a theme for stash busting.  You can use the theme or just sew up stash in any way you desire.  January's theme is to use up bits of fabric that are less then a yard.  Might be skipping the theme this month unless I get around to the Grainline studio moss mini, that might take less than a yard.

Butterick 5814 - Pattern Changes

1.13.2013

This post is entirely devoted to the fitting changes I'm making to Butterick 5814. If you don't think you'll ever make this dress, then no need to read further.  But if you're interested in my changes then buckle up, this is going to be a picture heavy post.

 1. Sleeve Changes.
Gertie blogged about how to fix the sleeves slipping off your shoulders.  I also shaved a 1/4" off the bodice seam and split the sleeves into two pieces.  In addition to all of that about 3/8" was removed from the new center sleeve seam line to make the sleeves snugger around my arm.

To take care of the neckline gaping I made the following changes to the bodice pieces.

1. Left bodice piece
In the muslin I sewed a dart in the narrow end of the piece.  To replicate this in the pattern, you'll need to slash and close that area as if there were a dart there.  First step is to draw a dart the same size and location on the pattern as it was on the muslin. On my pattern it was about 2" and very close to the lower pattern notch.

Next cut one leg of the dart...

and close the dart thereby eliminating the extra length in the neckline.

This does make the curve of the neckline look a little rough, so add some paper to the top and bottom of the piece and smoothed the curve.


2. Right Bodice
One the right bodice I decided to remove the extra length at the inset seam.  The first step to do this was to fold and pin the pleats on the pattern.  Then on the seam line measure in the amount of length you need to remove and draw in a new seam line. On my pattern it was about 3/4".

Next you'll need to put the inset piece on top of the new seam line to make sure they are the same length.  On my pattern they matched up fine.  If they hadn't I probably would have made the inset a little taller to match the new bodice seam.

Since the seam lines match you can draw a new edge and trim off the excess.

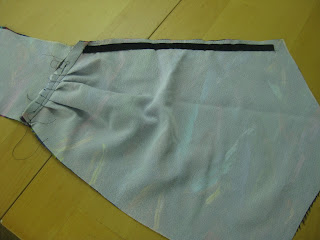
The pattern edge will now look like this, which is fine because when you pleat and sew it the fabric will make a nice straight line.


3. Right Bodice Lining.
The right bodice lining is a little trickier since it's not obvious where to remove the excess neckline length. The best way to do this is to pin the pattern pieces together as they would be sewn.  This is the right bodice, inset, and lining all pined together along the seam lines.

When you do this you'll see that the pattern pieces match everywhere except on the side seam.  We'll take the excess length off here so they match up. Use the inset side seam to mark where the new lining side seam should end.

Then unpin everything and trim the lining piece. On my pattern it was again 3/4".


After making all these changes I mocked up some new sleeves and refit the dress.
  The sleeves are no longer sliding around and the neckline, though deep, feels secure.   I've already cut into the real fabric so some fun in process shots to come.


Cowboy Shirt - First Garment of 2013

1.10.2013

Before posting my sewing resolutions/taking on a sewing dare, I decided to start the year off with a new pattern hack to my shirt block.  This block was created last year after using Simplicity 2246 to knock off an Anthropologie shirt.  The shirt fit so well I made a pattern block so that all those lovely fitting changes would automatically be in any new shirts.  The first shirt made from this block was a simple button down with 3/4 sleeves that was never blogged about, but does appear in my PR reviews.  

After marathoning "True Blood" season 4, I got the itch to make a shirt with pointed western style yokes.  The internet was very helpful with giving me some good pics of this style in RTW shirts.  Got out the blocks and did a little drawing.....

Front Yoke


Back Yoke

Instead of using a plaid or tiny floral print like RTW, I decided to pick some cotton with a woven geometric print.  I like to be a little bit cowboy, a little bit rock and roll. ;)
 I lovvvvve this shirt, the cotton is very densely woven so it crisp and hardly wrinkles. The pointed yokes were a little tricky to sew, but I was able to get a nice shape after a few tries.  With the white top-stitching they really pop.


I'm also really pleased with the collar which has nice sharp points thanks to Pam's tutorial.
The collar also has Pam's Light Crisp Interfacing which turned out it be just perfect for this cotton with a little body to it.  (I'm a big fan of all of Pam's interfacing.)
My fabric is long sold out from emmaonesock.com but if you love it then Waechter's still has it in stock.  For more pics check out the flickr set.

Butterick 5814 First Muslin

1.07.2013

Hey, are you game for looking at me in low light with exposed bra straps?  Well then you're in luck because I've got pics of the first muslin for Butterick 5814. 
Nice Smock

I went the extra mile on this muslin since it was my first time doing anything with boning.  There was some plastic boning lying in the stash so I inserted into the muslin as directed.  Also put in a back zipper because skipping this step totally bit me in the ass during sewing disaster month October 2012.  As far as first muslins go this one is pretty good, but does need a little more work.

1. The straps fall off the shoulder at the drop of a hat.  I was messing around with my new tripod and both straps fell off making the entire bodice fall around my waist.  Not something you want to have happen in a real social situation. (Though it might liven up a party.)  Planning on doing the seam trick Gertie did of adding a curved shoulder seam to the sleeve.

2.  Even with the sleeve change pinned out there was still too much gaping of the neckline.  On the right side I'm planned on tucking more of the main bodice piece into the inset.  On the left side I might have to do some sort of hidden dart.  Going to play around with the piece some more to see if there is another solution.

3.  Originally I thought the waist was a bit too big but then remembered to do the "sit down and breath" test.  The waist is perfect when sitting down so it will stay as is.  The skirt is surprisingly perfect with only my normal change of increasing the back dart intake.

Now it's time to get out the scissors, tape and seam ripper and make those changes.

Sewing Dares

1.05.2013

Sewing Dares


I'd never thought I'd say this but Twitter is awesome.   I've recently started following and being followed by a bunch of other sewing ladies.  Nothing is more fun than talking about what each of us is sewing, or drooling over someone's latest garment.
Last night Gillian of Crafting a Rainbow started issuing sewing dares to anyone who asked for one.  I don't have a good follow through on sewing challenges, but Gillian assured me that there would be no judgement if the dare was not met.  See Twitter sewing ladies are cool.  After taking a look-see through my flickr account Gillian issued me the dare of sewing "Something sexy for going out/events. I want to see some Va-va-voom." Ooooo I get to make something fun for my dare, It's On!

After some late night mulling over patterns and stashed fabric I think there is a winner..... Gertie's beautiful retro dress Butterick 5814.
Is this enough Va-va-voom for yah?
Lucky for little old me the stash has an extensive Crepe de Chine collection.  Should I go with the lime green leopard print, or maybe use the skulls and roses print.   In the end there was one print that shouted the loudest.....jewel toned feathers.
Please wipe the drool from your face.

So I'm using stashed fabric, a stashed pattern and getting to try my hand at some boning for the first time!  Clear off the sewing table (dining room table) cause all other projects are on hold, I'm going do this dare!

See the complete list of sewing dares here.

Do you want your own sewing dare?  Tweet Gillian at @gilliancrafts #sewingdares.
Proudly designed by Mlekoshi pixel perfect web designs